Spicy Scallop Chirashi Bowl

Spicy Scallop Chirashi Bowl

Simple and SO tasty!


For those unfamiliar with the concept, chirashi is basically “stuff on sushi rice”, and it’s a fantastic way to take your sushi out of the roll and into the bowl. For people who don’t like seaweed, it’s a great way to make this kind of combination more accessible. This particular recipe is also incredibly easy to make, assuming your sushi rice doesn’t have some kind of really interesting science-experiment-level reaction with your rice cooker, as mine did, forcing a delay while you make MORE rice on the stove. Yeah, some days are like that. At least it all turned out tasty.

As a note, I’ll point out that you don’t have to use the specific items that I recommend; there are other ways around. It’s easy enough to substitute with items that better fit your particular bend or that are easier for you to find (for example, swap the scallops for firm tofu to make it vegetarian). To that end, I’ve broken things up a little, and I’m offering up a couple of solutions to the matter at hand.

Lastly, and very importantly, if using items out of a box or a bag, such as sushi rice, please do follow whatever directions exist on the packaging so that you’re cooking the items properly. That may mean adjusting the timing of the different pieces, but a little preparation can make everything ready right at the same time. Substituting regular long-grain white rice for the short-grain sushi rice may not work as well when it comes to the rice wine vinegar/sugar mixture and it won’t have the stickiness of its short-grain cousin, so your mileage may vary depending upon where/how you employ alternate options. Even so, if you taste the combinations as you put them together, you can adjust on the fly and truly make this dish something unique for you.


Prep Time: 15 minutes, some of which is concurrent with the rice cooking

Cooking Time: 30-75 minutes, depending upon rice cooking method

Serves: 2


Ingredients

1 cup sushi rice, uncooked

2 cups water

1/4 cup rice wine vinegar

2 Tb white sugar

3/4 – 1lb fresh sea scallops

1/4-1/2 cup sherry or white cooking wine

2 Tb olive oil

4 Tb Japanese mayonnaise or (any brand) full-fat mayonnaise

2 tsp Sriracha OR (2 tsp Tabasco sauce + 1 tsp garlic powder)

1 oz peeled & cut mango

1 avocado


Make it Happen

Rice:

1. Prepare according to instructions on the package, noting that rice cooker cooking time may be longer than if you cook it on the stove. Best to get the rice going FIRST, since that will be the longest of the items that needs to be made.

2. When the rice is done cooking, measure out the rice wine vinegar into a glass (or other form of microwave-safe) measuring cup; add the sugar and stir to combine. Heat in the microwave on high for 1 minute.

3. Stir the heated mixture well, until the sugar dissolves, then sprinkle/gently pour it on the rice as you stir to coat the rice with the mixture. [Note that typically, when making sushi, you want to cool the rice somewhat before this particular step. For chirashi, some of the pressure is off, since stickiness and consistency are fine in a bowl; if you are making the rice for sushi in rolled form, definitely fan the rice before and while you do this step.]


Scallops and Mayo:

1. When the rice has approximately 20-25 minutes left to cook, add the olive oil to a non-stick pan and heat on medium-high.

2. Wash the scallops and remove the foot from each scallop; then chop into bite-sized pieces. Add the scallops to the pan and stir to coat. Let the scallops cook for about 3-4 minutes before turning to cook the other side, then add the sherry or cooking wine and move on to the spicy mayo.

3. Spicy mayo can be done with the Japanese or full-fat mayo and EITHER Sriracha (spicy option #1) OR a combination of Tabasco sauce and garlic powder (spicy option #2). In either event, put the mayo into a small glass or other non-reactive bowl and then add the your chosen spicy option.

Since “spicy” is all in the tastebuds of the beholder, the quantities I list above are just illustrative; adjust as needed to meet your needs.

If the mayo is TOO spicy, add more mayo. If the mayo isn’t spicy enough, add more of your spicy option, noting that if you’re doing the Tabasco/garlic powder combination, you may need to adjust both. Set aside when done.

4. Keep stirring the scallops until they’re fully cooked; typically they’re done by the time the wine has finished cooking off, which can be about 10-15 minutes total cook time from when the scallops went into the pan.

5. Chop the mango and avocado into bites approximately the same size as the scallops.

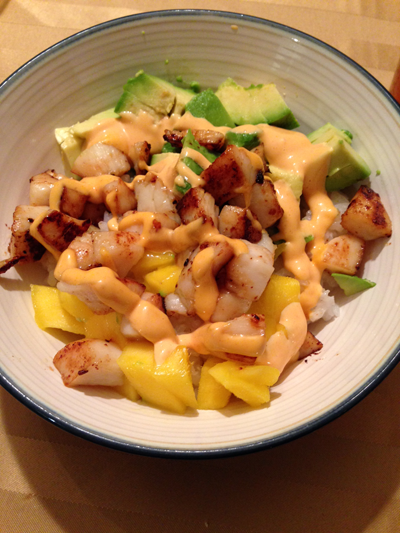
6. When the scallops and rice are done, place a layer of rice in the bottom of a bowl, then add half the scallops to the center, in a stripe, followed by stripes on either side with half each of the chopped mango and avocado. Drizzle the spicy mayo on top.

You may find that you want to add some soy sauce, as well, if you’re used to having that on rice, so it may be worthwhile to keep a bottle of Kikkoman or Tamari handy. If you decide to do that, I would recommend waiting until after you’ve put the bowl together and then add soy sauce to taste.

Sweet Sockeye Salmon

This is one of those weeks where I just didn’t feel like buying meat. Thing is, we stockpile over the course of the year – a buy-one-get-one-free deal (BOGO) here, a trip to BJ’s there, and there’s just MEAT in the freezer. And, when dh started to explain how we’re just overspending on our grocery bill, I couldn’t stomach the thought of putting out money for fresh meat when I knew we had stuff in the freezer that was just in need of a thaw. And that’s where the salmon comes in. Being that we’re on a sustainable seafood kick that we are trying to make a lifestyle choice, we’d purchased a pair of frozen sockeye salmon packages on a BOGO a few months ago. (The price was decent as a BOGO. Under normal circumstances, it would be overpaying – something like $11.99 for 12oz, which works out to $15.99/lb). We’d grilled the first package not long after getting it, and we found it…dry. Something about it just didn’t work and we attributed this to the fact that it was frozen. DH was highly skeptical that we could make it work, so he’d been leery about my trying something else with the frozen salmon, but I promised that I would do something on the stove that I thought might add some more moisture.

Now, layer into this the fact that the kids don’t really get into meat much, unless it’s a fish stick/square (ds) or a chicken nugget (dd). Neither one really is big into salmon, so I had an uphill battle to climb. I’ll give away the ending: they still didn’t like it. BUT, I was able to get out of dd that the issue wasn’t the preparation but the fact that it was salmon. She just isn’t into salmon in any form. DH and I, on the other hand, liked how this turned out. And, he liked it enough that it convinced him I should go back later this week and pick up more (it’s on a BOGO again), not only so we have it for this recipe but also so that he can make this lovely Salmon Stroganoff that’s in the On Rice cookbook we have. (We’ve made it before with fresh salmon, and this preparation showed him that the frozen would work, too.)

We served this salmon on soba noodles, for a change of pace, and I roasted some golden beets to have on the side. That’s the thing about the CSA – before I started that, I don’t think you’d ever hear me exclaim “OMG! These golden beets are *GORGEOUS*!”, and yet I did that very thing this afternoon. Score one for locally produced veggies and an adult willingness to open one’s mind (and palate) to things that, as a kid, seemed oogy from any distance.

Note: the only mod suggested by dh was that the next time we should include shallots, to add even more sweetness. If you want to add shallots, I’d recommend 1 large shallot, peeled and minced, going in the pan at the same time as the salmon (or even just before).


Sweet Sockeye Salmon

Sweet Sockeye Salmon on Soba...this dish is brought to you by the letter S


Prep Time: 5 mins (assuming thawed salmon)

Cooking Time: 25 mins

Serves: 2


Ingredients

12 oz sockeye salmon fillets

1/2 cup white cooking wine (divided)

1-2 Tb olive oil

2 tsp crystallized ginger

1 Tb honey (preferably wildflower)


Make it Happen

1. Remove the skin from the salmon and cut the salmon into pieces no more than 1″ x 1-1/2″.

2. Heat a non-stick skillet over medium heat; add the olive oil to the pan.

3. Add the salmon to the pan and turn to ensure even cooking after about 2 mins.

4. Add about 1/4-1/3 cup of the white wine to the pan, to start the poaching process. Let this cook until the liquid is reduced by at least half.

5. Sprinkle the ginger around the salmon and let it cook for another couple of minutes, until the liquid is mostly gone.

6. Add the remainder of the white wine to the pan. Let this go until the liquid is nearly gone.

7. Drizzle the honey over the salmon pieces and toss/turn to coat them evenly. Let this go until the liquid is down to no more than maybe 1 tsp and serve with rice, noodles (pairs nicely with soba!) or the starch of your choice.

Grilled Scallops with Bruschetta

Oh Bruschetta. Whoever initially thought up the idea of bruschetta was on a par, intelligence-wise, with the person who thought to put peanut butter and chocolate together. What can you put bruschetta on, you might ask? The answer is: YES. During a stint with Weight Watchers, I learned that bruschetta can be a fantastic topping for baked potatoes – it’s lower in both fat and calories than my usual sour cream topping. Bruschetta on eggs? Yes. Crostini (maybe with a little parmesan on top)? OH MY YES. It’s just a miraculous and incredibly easy thing to make.

For the first week of my Adventures in CSA, I thought that pairing some of the tomatoes (in bruschetta form) with fresh sustainable (!) sea scallops from the grocery store would do the trick. The answer is: most indubitably YES. This was a massive win, and though I didn’t do the grilling (DH handled that task rather nicely), I ran the kitchen and had the stove happily bubbling.

The full dinner that night: Grilled Scallops with Bruschetta, Garlic & Parmesan Couscous, and Glazed Carrots. (Full disclosure: the couscous was the Near East boxed variety…it has high acceptance rates with the kids, but I don’t think adding something boxed diminished the meal in any way.)

Dinner: grilled sea scallops with bruschetta, garlic & parmesan couscous, and glazed carrots

Scallop Dinner. Yummy Yummy.

Can you make this dish with bay scallops? Probably – although I wouldn’t do them on the grill. Bay scallops are small enough that I’d probably just pan fry them instead. Sea scallops, especially the wild ones that are sustainably fished, can be really nicely sized for the grill.

My instructions below are based on the idea that you’re doing these together – so it’s all about timing to get things done at the same time. If you want to make *just* the bruschetta, figure on about 10 min of prep time to cut everything, and then another 10 min of cooking time.


Serves: 2-3

Prep: 30 min (marinating the scallops); 10 min (chopping for the bruschetta)

Cook time: 8-10 min (scallops); 10 min (bruschetta)


Ingredients: Grilled Scallops

1 lb sea scallops

1/4 cup extra virgin olive oil

2 Tb lemon juice


Ingredients: Bruschetta

1 large slicing tomato, diced

2 medium or large shallots, minced

1-1/2 Tb extra virgin olive oil

2 tsp lemon juice

1 tsp dried parsley

1 tsp dried cilantro

salt and pepper, to taste


Make it Happen

1. Rinse the scallops and place in a mixing bowl; add the olive oil and lemon juice noted above for the scallops. Marinate for 30 mins.

2. When you start the grill, start getting the bruschetta in the pan. Start by heating up the olive oil for the bruschetta in a medium non-stick skillet over medium heat. Add the shallots, and stir to coat them with the oil. Continue to let the shallots go on their own for about 1-2 mins.

3. Add the tomatoes to the pan, stir well to combine. Sprinkle or grind salt and pepper onto the mixture and stir again, only adding a small amount. (I use sea salt and black pepper grinders, and I did just a couple grinds of each.)

4. Get the scallops on the grill. Total scallop cook time should probably be about 8-10 minutes, but definitely check them for doneness before removing them from the grill. You’ll need to turn them half-way through cooking, so figure on turning them around the 4th or 5th minute of cooking.

5. Continue to stir the tomato/shallot mixture, looking to see that the amount of moisture released by the tomatoes will first boil and then start to cook off. Add the lemon juice earmarked for the bruschetta, as well as the parsley and cilantro. Stir to combine.

6. Continue to cook until the scallops are done or until the majority of the excess moisture is gone from the pan. Remove from heat.

7. When the scallops come off the grill, top with bruschetta.

My result looked like this:

Grilled Scallops with Bruschetta

So tasty...

The sugar released by the shallots combined with the rich flavor of the CSA tomatoes to make this probably the sweetest bruschetta I’ve ever had. I have made variations on this before, where I added garlic with the shallots, and that adds a nice tang that’s totally worth doing – but we were out of garlic (the horror!!), so I made do. And this definitely worked.